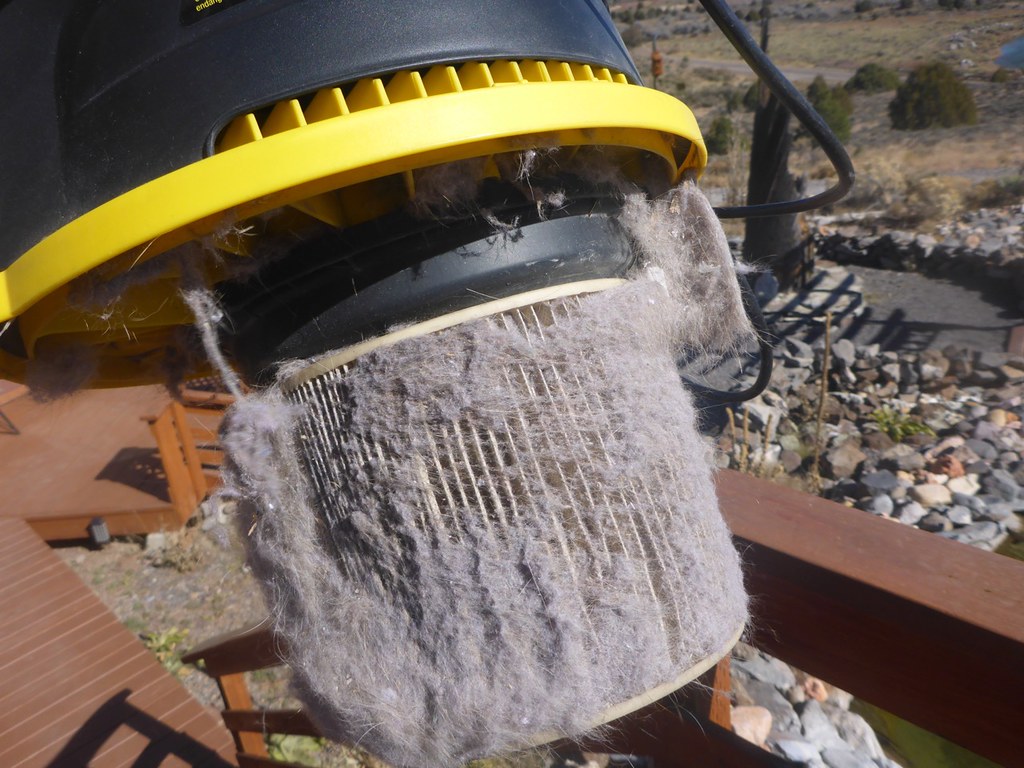
The vacuum filter goes bad over time. You can clean the filter, but eventually, it will need to be replaced. Here is a step-by-step guide on how to change the filter in 5 different canister vacuums.
Dyson Big Ball Vacuum Filter:
The Dyson Big Ball Vacuum is a canister vacuum that uses a cyclone system to capture dirt and dust. The vacuum has a lifetime HEPA filter that can be washed and reused.
Changing Dyson Canister Vacuum (Ball Vacuum) is easier than you think.
Here are the easy steps:
- Remove the cylinder from your Dyson. Remove the filter from the cylinder.
- Replace the Filter. Reattach the cylinder to your Dyson’s body. Locate the second filter; it’s in the ball of the machine.
- Turn the ball lock counterclockwise until it releases. Once you’ve done that, pull on the two tabs to pop the filter out of its slot. Replace the filter and reattach it to the housing; it will click into place automatically!
- Re-screw the ball in and rotate the ball lock clockwise until it is secure.
Here is a detailed video on how to do that:
Miele Canister Vacuum Filter:
Miele canister vacuum is one of the most popular models on the market, and it is also one of the easiest to maintain. The canister-style vacuum has a simple design that makes it easy to access and change the filter.
Step-by-Step Instructions
Step 1: Open the Housing
To replace the premotor filter, first, remove the existing one. To release the compartment cover, grasp the housing and pull on the release tag near the handle. Pull forward until it clicks to show it is open and locked in position when removing the lid.
Step 2: Remove the Old Dust Compartment Filter
Remove the dust bag from inside the device. Remove the dust bag inside your PC vacuum cleaner, then remove and discard it. The dust chamber is accessed by unlatching it. To view the motor filter part of the dust chamber, unclasp the dust bag. Set aside any previously filled bags. Uncover the old premotor filter in its plastic casing to reveal it.
Step 3: Cut the New Filter Based on Proper Size
Replace the filter, and you’ll be able to do it using the old one as a guide. To fit the casing, you must cut the filter to length. You may also use scissor marks on the replacement filter.
Bissell Canister Vacuum Filter:
Bissell is a canister vacuum that helps to remove dirt, dust, and other allergens from your home. This vacuum is usually used to clean hardwood floors and other surfaces.
- The BISSELL OptiClean Compact Canister Compact is a lightweight, compact cleaning device with a cyclonic system and valuable features for an excellent cleaning experience.
- Only BISSELL replacement filters should be used in your vacuum.
- Unplug the vacuum from the wall before cleaning your dirt cup filter. Press the dirt tank release button on the carry handle and lift to remove it. Remove the dirt tank lid by clipping it and pivoting it backwards.
- To take out the filter, push it upwards. Grab the filter and pull it straight up to remove the premotor filter. The premotor filter may be hand washed in cold water with mild detergent and then air adequately dried before reusing in the machine.
- When cleaning, close the dirt tank and replace it with the product. Replace the filthy tank into position with the little ridge pointing down, then reinsert your prefilter into it. On top of the premotor filter, place a mesh tab facing up.)
- The post-motor filter aids the filtering process by returning clean air to the room. Depress the button and pull out and away from the vacuum to remove the rear of the vacuum’s filter door. To remove it, push down on top of the post-motor filter tab and pull it towards you.
- Your post engine filter should be changed every three to six months for optimum performance.
- Replace the filter door by pressing the tab on the bottom first and pressing the button at the top of the filter door
- Release the button and ensure that the filter door is securely locked.
Eureka canister vacuum:
Dust Cup Filter
- Unsure if the vacuum has been unplugged.
- Remove the latch from the vacuum’s body. To remove the handle, grasp the canister’s front and pull it out of the vacuuming region.
- Remove the canister’s top by grasping the filter assembly handle inside it. To release the handle, twist it clockwise.
- Please remove the filter basket and turn it upside down to reveal the pleated filter cone. Twist the bottom of the filter clockwise until the tabs along the top are released from the filter assembly. Remove and discard any existing filtering cone.
- Remove the pleated filter cone from the old filter assembly and replace it with new tabs in the slots at the top of the filter assembly. Attach the filter cone to the system by turning it clockwise.
- Turn the filter housing upside down, so the filter cone faces down. Replace the cover and twist it clockwise to keep it in place.
- Align the tabs on the bottom of the canister with the slots along the bottom of its opening. Replace both pieces in their original positions, then slide back in and close the vacuum.
Pre-Motor Filter
- Make sure that the vacuum is unplugged.
- Remove the latch above the canister from the vacuum’s body. Grab hold of the front of the canister and pull it out of its vacuuming posture.
- Remove the top plastic filter gasket from the bottom of the canister. Remove the gasket from the vacuum by pulling it straight up.
- Remove the old premotor filter from the vacuum and throw it away. Insert the new prefilter motor into the vacuum’s entrance. Wrap the plastic filter gasket around the filter to keep it in place.
- The tabs on the bottom of the canister should be lined up with the slots along the bottom. Replace and secure in position the vacuum canister latch.
Electrolux Canister Vacuum filter change
Step 1
Remove the previous bag and dispose of it in your usual manner. Remove the old vacuum canister from its housing by pressing in the hose release and pulling out the hose as if to replace a vacuum bag. Open the lid by pressing on the front lid release latch.
Step 2
Pull the bag holder straight out of the vacuum. Grasp the top of the filter holder at the rear of the bag compartment and pull it forward.
Step 3
Lift the dirty filter out of the vacuum and insert a new filter. Press the filter holder back into place until it snaps securely.
Step 4
Place the bag holder with the bag back inside the canister. The holder slides into a channel on each side and only goes in one direction.
Step 5
Close the canister lid and push the vacuum hose back into the canister.
Summary of the Article:
In this article, you learned how to change the filters in 5 different types of vacuums. You also learned where the filters are located and how often they should be changed.